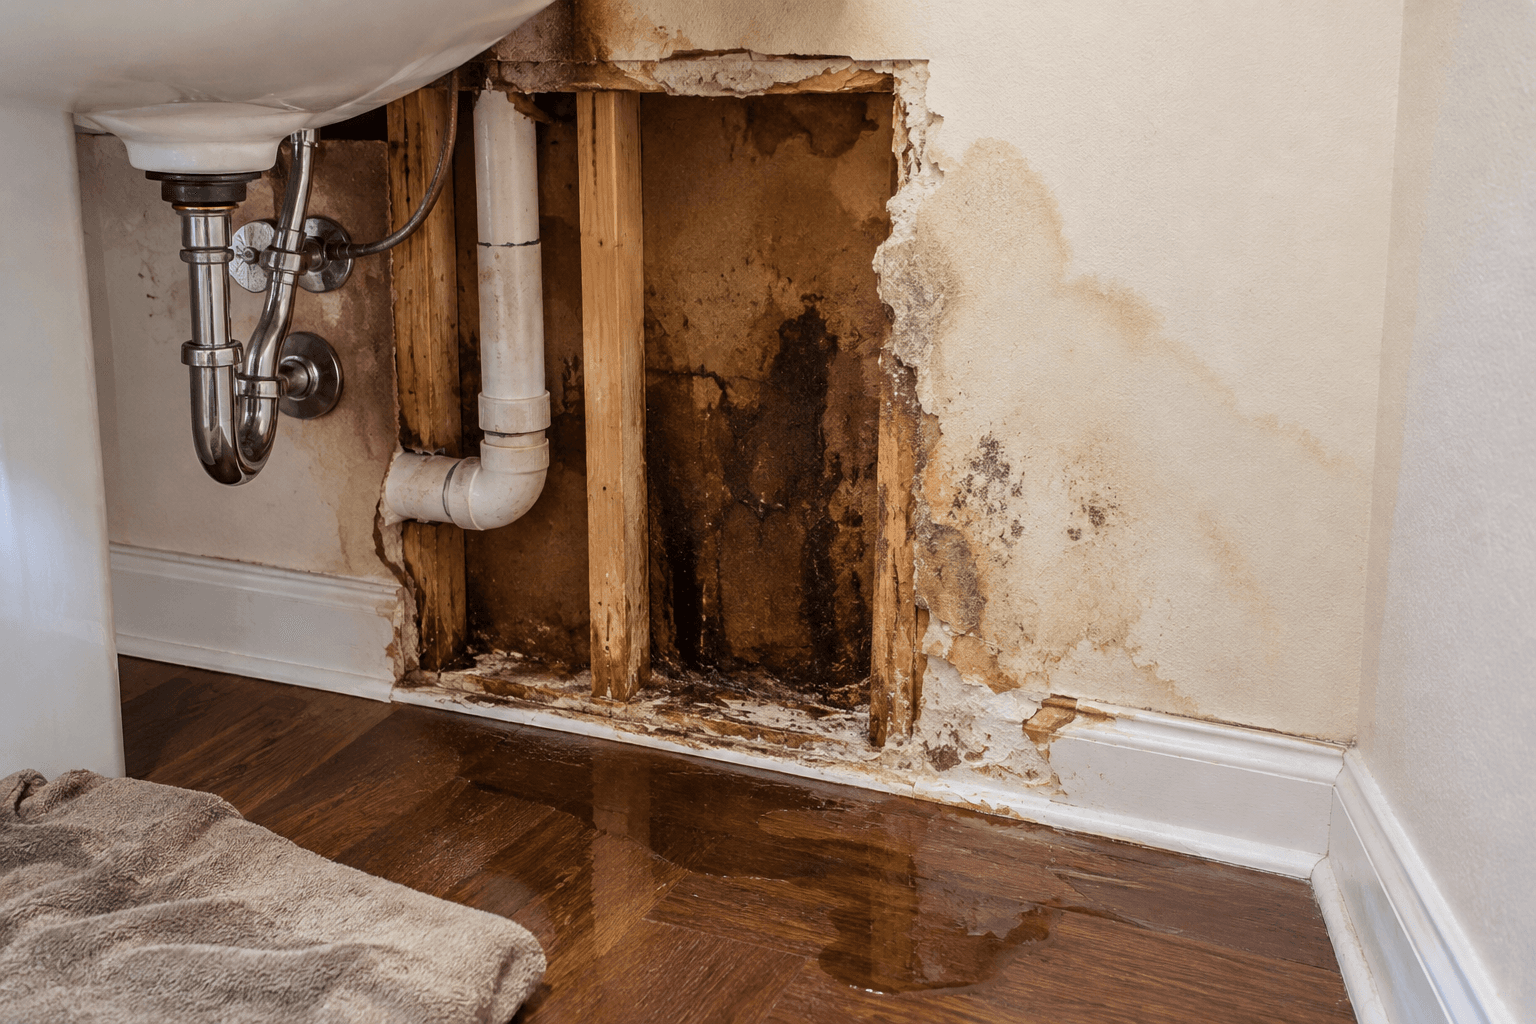
A plumbing leak does not always leave behind a dramatic puddle. Sometimes the pipe is repaired, the visible water is cleaned up, and everything seems fine. The problem is that water can travel farther than expected once it gets behind drywall, under flooring, or into a wall cavity.
That is why a leak that looks minor at first can still lead to damaged materials days or even weeks later.
Homeowners do not need to tear apart a room every time a faucet drips, but after a meaningful plumbing leak, it is worth checking the surrounding area carefully. Catching hidden moisture early can make the difference between a small repair and a much larger project.
Start With Where the Water Actually Came From
Before checking for damage, make sure the source of the leak is understood and repaired.
This sounds obvious, but water can be deceptive. A wet spot on the ceiling does not necessarily mean the leak started directly above it. Water can follow pipes, framing, electrical lines, or other surfaces before it finally becomes visible.
Common plumbing-related sources include:
Supply lines under sinks
Toilet connections
Washing machine hoses
Dishwasher lines
Refrigerator water lines
Water heaters
Shower or bathtub plumbing
Pipes inside walls or ceilings
Frozen or cracked pipes
Drain line leaks
Once the source is stopped, look at the route the water may have taken rather than focusing only on the most obvious wet area.
For example, if a second-floor bathroom leaked into the ceiling below, moisture may also have entered the floor assembly around the bathroom, the wall cavity beside the pipe, or insulation between floors.
Check Drywall for More Than Just Stains
Water-damaged drywall is often easy to recognize when there is a large brown stain or sagging section, but early signs can be subtle.
Look for paint that is bubbling, peeling, or beginning to separate from the wall. Drywall may also feel softer than the surrounding area when gently pressed.
Changes in texture can be another clue. A section of wall may appear slightly swollen, uneven, or discolored before more obvious damage develops.
Ceilings deserve extra attention because wet drywall can become heavy. A badly saturated ceiling that is sagging or bulging should not simply be pushed back into place. Water may be trapped above it, and the affected material may need to be removed.
Small cosmetic changes should not automatically be ignored either. Even when the surface dries, moisture may still be present behind it.
Inspect Baseboards and Trim
Baseboards are one of the easiest places to spot evidence of water that has traveled along a wall.
Wood and fiberboard trim can absorb moisture from the floor or drywall behind it. This can cause the material to swell, separate from the wall, warp, or develop peeling paint.
If a baseboard has pulled away from the wall after a leak, there may be moisture behind it.
The same applies to door trim and other finished wood around the affected area. These materials can sometimes be dried and reused, but significant swelling or deformation may be permanent.
Pay particular attention to corners because water can collect there before evaporating.
Do Not Assume the Floor Is Dry
Flooring often hides moisture extremely well.
A tile surface, for example, may look perfectly normal while the underlayment or subfloor underneath it remains damp.
Hardwood flooring can begin to cup, crown, or separate as it absorbs moisture. Laminate flooring is especially vulnerable because moisture can cause the inner material to swell.
Carpet presents a different problem. The top may feel almost dry while the padding underneath remains wet.
After a larger plumbing leak, check for:
Soft areas
Loose flooring
Warped boards
Swelling
New gaps between boards
Musty odors
Discoloration around edges
Damp carpet padding
If water reached underneath a finished floor, drying only the visible surface may not be enough.
Look Inside Nearby Cabinets
Leaks under sinks and around appliances frequently affect cabinets before homeowners realize how far the water has spread.
Remove everything from the cabinet and inspect the bottom panel, back wall, and corners.
Particleboard and MDF are commonly used in cabinets, and both can swell noticeably after absorbing water. A cabinet floor that feels raised, rough, or distorted may already have suffered moisture damage.
Do not forget to look underneath the cabinet when possible.
A leak from a kitchen sink, dishwasher, or refrigerator can sometimes travel behind or underneath the cabinetry without leaving much visible water in front of it.
Using a flashlight along the toe-kick area can help reveal staining or moisture that would otherwise be missed.
Pay Attention to Smell
A persistent musty odor after a leak should be taken seriously.
Materials do not have to look soaked to hold moisture. Drywall paper, wood, insulation, carpet padding, and other porous materials can retain enough water to create odor problems.
If a room still smells damp several days after the plumbing issue was repaired, there may be an area that has not dried properly.
The strongest smell may also help narrow down where moisture is trapped.
Walk around the room slowly and check closets, cabinets, corners, and adjoining spaces. In some cases, the odor is more noticeable in an enclosed area than near the original leak.
Use a Moisture Meter When Necessary
Visual inspection can only tell you so much.
A basic moisture meter can be useful after a leak, particularly when drywall or wood looks normal but you are unsure whether it has completely dried.
These tools allow homeowners to compare the affected area with a known dry area nearby.
The exact reading matters less than the comparison. If one section of drywall is consistently reading much higher than similar drywall elsewhere in the room, more drying or investigation may be necessary.
Some meters use pins that penetrate the surface, while others can estimate moisture without making holes.
For larger leaks, professional moisture detection equipment can provide a more complete picture of how far the water traveled.
Check the Room on the Other Side of the Wall
This step is easy to forget.
If a pipe leaks inside a wall, inspect both sides of that wall whenever possible.
A bathroom leak may affect the bedroom behind it. A kitchen supply-line leak may travel into a pantry, basement ceiling, or adjacent cabinet.
Water does not care which room it started in.
Also inspect the floor below the affected area. Even if there is no visible dripping, look for ceiling stains, changes in paint texture, or dampness around light fixtures and vents.
The actual area affected by a plumbing leak can be larger than the initial wet spot suggests.
Move Furniture Away From the Area
Furniture can hide both moisture and damage.
If water reached a wall or floor behind a couch, dresser, cabinet, or bed, move the item away temporarily and inspect underneath it.
Air movement is also important during drying. A large piece of furniture sitting directly against damp drywall can slow evaporation.
Check the furniture itself as well. Wooden legs, fabric, cardboard backing, and upholstered materials can all absorb water.
Items that remain damp can continue introducing moisture into the room even after the floor and walls begin drying.
Understand When Drying Is Not Enough
Not every wet material needs to be replaced.
Many hard, nonporous surfaces can be cleaned and dried successfully. Some wood materials may also recover if they are dried quickly.
Other materials are more difficult.
Saturated insulation, heavily damaged drywall, swollen particleboard, and soaked carpet padding may need to be removed depending on how wet they became and how long they remained that way.
The type of water involved also matters.
Clean water from a broken supply line is very different from water coming from a drain backup or other contaminated source. Materials exposed to contaminated water may require more extensive removal and cleaning.
When the extent of a leak is unclear, homeowners can consult resources such as Suffolk Water Help for information about water-damage cleanup and the next steps after indoor water intrusion.
Keep Watching the Area After It Looks Dry
One of the biggest mistakes after a leak is assuming the problem is finished as soon as the surface looks normal again.
Continue checking the area over the next several days.
Watch for new discoloration, paint changes, flooring movement, unusual smells, or dampness returning.
If the leak was substantial, taking a few photographs immediately after the incident can also be useful. They provide a reference point for determining whether a stain is growing or a floor is becoming more distorted.
You should also confirm that the plumbing repair itself is holding. Check the repaired connection again after the water has been turned back on and after the fixture or appliance has been used several times.
The Bottom Line
After a plumbing leak, removing visible water is only the first step.
Water can move behind walls, underneath floors, inside cabinets, and through ceilings before it is ever noticed. A careful inspection of the surrounding materials can reveal problems while they are still manageable.
Start with the source, inspect beyond the obvious wet spot, and pay attention to changes in drywall, flooring, trim, cabinets, and odors. If something still seems damp after the surface has dried, investigate further rather than assuming the moisture will disappear on its own.
The sooner hidden water is found, the easier it usually is to limit the damage.
About Mubashir Yaqoob
Mubashir Yaqoob researches and writes practical home repair guides for Home Repair Manual, focused on translating technical roofing, plumbing, and maintenance information into clear advice for homeowners.
View all posts by Mubashir Yaqoob